Tampilkan postingan dengan label blogger. Tampilkan semua postingan

Blogger Guide, The word-verification option

By // Tidak ada komentar:

Blogger Guide, The word-verification option

To prevent automated software from posting spam comments on your blog, you can ask visitors to enter a short code called a CAPTCHA, before they can post.

Turn on word verification:

  1. Sign in to blogger.com
  2. Select "Settings" from the drop-down menu.
  3. On the left, click Posts and comments.
  4. Under "Comments," select Yes for "Show word verification." Visitors to your blog will be shown an image of letters or numbers to type to get permission to comment.

With every visual CAPTCHA there will also be an audio version, for visually impaired users. Just click the icon next to the word verification field, and you will hear a list of numbers. Typing these numbers will let you complete the verification step.
Note: Even if you don't have word verification turned on, anonymous commenters might be asked to enter some text. This helps protect your blog from abuse.
Related Articles

Blogger Guide, Comment Inbox

By // Tidak ada komentar:

Blogger Guide, Comment Inbox

To make it easier for you to manage your comments, we’ve created a new Comments tab for you to access them. Here, you can manage published comments, comments that have been flagged as spam and comments awaiting moderation if you have turned on Comment Moderation.
Users with Comment Moderation turned on will continue to see comments that need moderation and have not been flagged as spam in Comments | Awaiting Moderation. Users without Comment Moderation will not see any comments in Comments | Awaiting Moderation.

Spam Inbox

Blogger now filters comments that are likely spam comments to a Spam Inbox, much like the spam folder in your email. When someone leaves a comment on your blog, it will be reviewed against our spam detector, and comments that are identified as possible spam will be sent to your blog’s Spam Inbox, found at Comments | Spam.
You can help improve our ability to automatically detect spam comments by checking your Spam Inbox and deleting spam comments and marking real comments that may have been flagged as spam as Not Spam.
If you have questions about what constitutes spam on Blogger, please review our Content Policies.

Blogger Guide, Moderate comments

By // Tidak ada komentar:

Blogger Guide, Moderate comments


The ability to moderate comments gives you control over the kind of messages people leave on your blog. You can find the comment moderation (3) setting on the Settings | Posts and comments tab, along with all of the other comment settings:
Settings for comments You can decide if you'd like to always, sometimes, or never moderate comments. If you select "Always," you'll have the option to enter in an email address where you can receive notifications that there are comments awaiting moderation. If you select "Sometimes," you'll be prompted to specify how many days old the post should be before it requires moderation. "Sometimes" is a good option for bloggers who want to make sure that comments on all posts are kept fresh and recent, and that conversation or debates on old posts aren't suddenly rekindled.
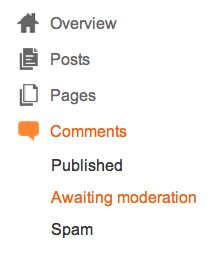
If you decide to set up comment moderation, all incoming comments will go to a special "Awaiting moderation" page, which you can find under the Comments | Awaiting moderation tab:
Settings for comments On this page, you'll see a list of all the comments that have been created but have not yet been approved or rejected. (This list excludes any comments made by admin members of the blog.)
Each line in the list displays the comment, the author's name, and the date it was created. You can approve or delete the comment, or mark it as spam by hovering over the comment and selecting the option you'd like. You can also select multiple comments and publish or reject them all at once by using the check boxes and buttons at the top of the list.
This entire process can also be done via email. If you entered an email address for moderation, you'll get a message for each comment which will contain "Publish" and "Reject" links, as well as a link to the main moderation page for the blog. The links provided will prompt you to sign in to your Google Account if you aren't already. The links will only work for new comments, and won't let you change the state of a comment that's already been moderated.
Notes:
  • Comments that have already been published or rejected are removed from the moderation list. Rejected comments are deleted and can't be recovered. Approved comments can be deleted in the usual way if you decide you no longer want them.
  • Only blog administrators will be able to moderate comments. Team members without admin privileges will not have access.

Blogger Guide, Comment with OpenID

By // Tidak ada komentar:

Blogger Guide, Comment with OpenID

OpenID is an open standard that allows users of OpenID-enabled services to log in to any OpenID-supported site with one set of login credentials. What does that mean for your blog? It's a way to authenticate user comments on your blog, without requiring your readers to have a Google Account. For example, let's say you have a friend, Brady from LiveJournal, who doesn't have a Google Account. With OpenID, he can now comment on your blog using his OpenID credentials and identify himself as the owner of http://brady.livejournal.com, instead of commenting anonymously. Please see the OpenID site for more information about OpenID.

How do I Enable OpenID Commenting on my Blog?

Simply go to your Settings | Posts and comments tab and select "Registered Users" or "Anyone" for the "Who Can Comment" option. Don't forget to click "Save Settings" at the top of the page.
Note that allowing "Anyone" to comment on your blog will allow more than just OpenID users to comment.

How do I comment Using my OpenID identity?

Start off by going to the comment page of the post where you'd like to comment. Then, select your OpenID provider from the drop down menu next to the "Sign-in using" option. If your OpenID provider is not on the list, please choose the "Any ID" option.
Next, provide your OpenID login information. After you click "Publish Your Comment," you will be redirected to your OpenID provider to authenticate your ID. After authenticating with the provider, you will return to the comments page and your comment will automatically be posted. Your comment will appear appear with a OpenID icon to the left of the comment.
Note that your display name is the name sent to us by the OpenID provider. If no display name is given, we will try to derive it from your OpenID URL. This is the name that will be displayed as the author of the comment and will be linked to your OpenID URL.

Blogger Guide, Delete comments

By // Tidak ada komentar:

Blogger Guide, Delete comments

You can delete any comment that you create on anyone else's blog, as long as you signed in to your Google Account when you left the comment. You can also delete any comments (registered or anonymous) that are left on your own blog, or on another blog for which you have admin privileges.
To delete a comment, first make sure that you're signed in to the correct Google Account (administrator of the blog or author of the comment). Then go to the blog and find the page where the comment is listed. Next to the comment, you should see a link to delete the comment.
Once you click "Delete," you'll be taken to a page where you can review the comment and confirm deletion, or change your mind and cancel. There's also a checkbox that says "Remove Forever" -- if you check that before you delete the comment, no trace of the comment will remain on your blog. Otherwise, the commenter's name and a message saying "this comment has been removed" will show up where the comment used to be. Once a comment has been deleted, there's no way to recover it.
It's not possible to edit comments. If you want to edit your own comment, you can simply delete it and then re-enter it with the changes. (However, the timestamp will be modified to reflect the time of the new comment.)

Blogger Guide, Leave comments on a blog

By // Tidak ada komentar:

Blogger Guide, Leave comments on a blog

If someone has comments enabled on his or her blog, then you can usually find a "comments" link at the end of each post, like this:
View commentsIf you click this link, you'll see the comments that other readers have left, and the option to leave your own. The link might open a pop-up window, depending on how the blog owner configured their comment settings.
> Beneath the text field for your comment are the identity options. (The list might have other options, depending on the blog's settings.)
Options might include:
  • Google Account: If you choose this option, your comment will be attributed to your Blogger display name, which will then link to your Blogger profile. If you've chosen to link your blog to Google+, then the name used on your Google+ profile will show up next to the comment, and link to your Google+ profile.
  • Anonymous: If the blog owner has allowed anonymous comments, then you'll also have the option to leave a comment anonymously. If you leave an anonymous comment, it will not link back to your blogs, Blogger profile, or Google profile in any way.
  • OpenID: Learn more about what it means to use OpenID to leave a comment.
  • Other third-party sign-in options
Notes:
  • This article only covers Blogger's commenting system. Some Blogger users have installed third-party comment systems (e.g. Haloscan, Enetation, etc.) which will work differently.

Blogger Guide Threaded comments

By // Tidak ada komentar:
Blogger Guide

Threaded comments

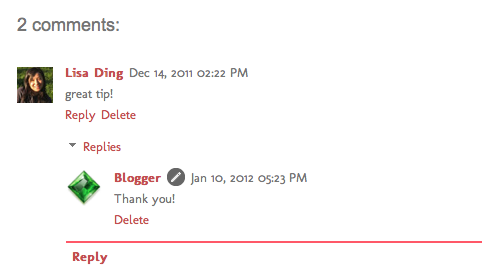
Single level commenting allows a reader to post a comment to a post. Threaded commenting allows a reader to reply to other reader comments on that post. Blogger supports threaded commenting with two levels -- the original comment, and the replies to that comment.
Threaded comments For example, let's say that Fred reads Julie's baking blog, and comments on a post she wrote about chocolate lava cake, suggesting that it tastes great with raspberries. Sarah, another reader of Julie's blog and also a huge fan of raspberries, wants to reply directly to Fred. With 2-level commenting, Sarah can click "Reply to this comment" directly under Fred's text, and respond to him. Anyone else interested in responding to Fred's comment can do so as well, adding onto the second tier of comments.
Enabling threaded commenting
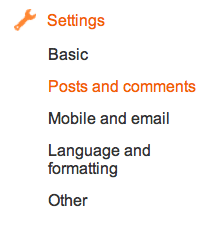
If you have commenting enabled on your blog, then threaded commenting will work provided you have your blog feed set to "Full," and have chosen the “Embedded" option as opposed to “Full page” or “Popup window.” To change your commenting settings, just go to the Comments section under Settings | Posts and comments. The setting to change your blog feed can be found under Settings | Other.
Notifications
A threaded commenting system means more discussion and back-and-forth dialogue. If you’d like to be notified of any updates to a discussion, just click “Follow by email” to subscribe to the thread. This way, you’ll be notified via email so you can keep up with the conversation. Keep in mind that this is a different subscription than the “Follow by email” gadget used to follow another blogger’s blog posts.

Blogger Guide Prevent unwanted comments and comment spam

By // Tidak ada komentar:
Blogger Guide

Prevent unwanted comments and comment spam

Blogger has several built-in measures for dealing with comment spam and other associated dastardly behavior.
  1. Only five html tags are accepted:
    <a> (for making links)
    <strong> and <b> (for making text bold)
    <em> and <i> (for making text italicicized)
  2. All links will automagically use the rel="nofollow" tag, so they'll receive no PageRank boost.
  3. You can choose to receive notification by email when new comments have been posted on your blog. This way, you can monitor them for spam and delete them when necessary.
  4. You can enable word verification for your comments. This will require an extra step in the commenting process, which will deter automated comment spamming systems.
  5. You can enable comment moderation, which will let you view new comments and approve or reject them before they appear on your blog.

Blogger Guide, Comments

By // Tidak ada komentar:

Blogger Guide About comments

By // Tidak ada komentar:
Blogger Guide

About comments

If you choose to enable comments, visitors to your blog will have the option to respond to your published posts. Blogger supports threaded commenting which means we display comments such that a reader can more easily differentiate between whether someone is making a general comment on the thread, or responding to another comment on the thread. Single-level comments will always be displayed chronologically.
Enabling comments
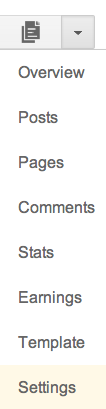
To enable comments, click on Settings from the drop-down menu on your Dashboard, then go to the area for posts and comments.
Drop-down menu, settings is the last option
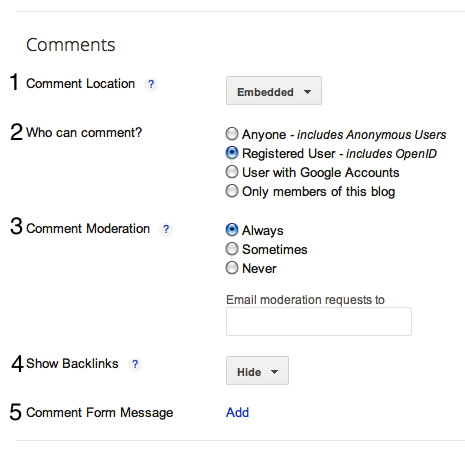
Comments section under Settings There, you'll see all the settings to manage your comments.
Settings for comments
  1. Comment location: Select "Embedded" if you'd like to enable threaded commenting.
  2. Who can comment?: Here you can specify who can comment on your posts. The options range from anyone (which means that anonymous users can comment without having to sign in to any type of account first) to only members of the blog (if it's a team blog).
  3. Comment moderation: Decide if you'd like to always, sometimes, or never moderate comments. If you select "Always," you'll have the option to enter in an email address where you can receive notifications that there are comments awaiting moderation. If you select "Sometimes," you'll be prompted to specify how many days old the post should be before it requires moderation. "Sometimes" is a good option for bloggers who want to make sure that comments on all posts are kept fresh and recent, and that conversation or debates on old posts aren't suddenly rekindled.
  4. Show backlinks: Turning on this option will show all the URLs around the web that link to your blog post. The URLs will be visible to both you and to the readers of your blog.
  5. Comment form message: Add a message to your readers who click to comment on your blog. Some bloggers like to include a little thank-you note, or details about how they tend to follow-up with comments.
Enabling comments on a post-by-post basis
If you don't want your comment settings to be blog-wide, you can click on the menu on the right side of the Post Editor to set post-specific comment settings. Here you can choose among three options: Allow; Don't allow, hide existing; Don't allow, show existing.
Options on the right side of your Post Editor
By // Tidak ada komentar:
Blogger Guide

What is a site feed?

A site feed is a machine-readable representation of your blog that can be picked up and displayed on other web sites and information aggregation tools. For information on enabling your feed, see: How do I change my site feed settings?
Special pieces of software called feed readers, news readers, or aggregators can scan your site feed, and automatically let your readers know when your blog has been updated. You can learn more at AtomEnabled.org.

Blogger Guide Change your site's feed settings

By // Tidak ada komentar:
Blogger Guide

Change your site's feed settings

To enable or disable the site feed(s) for your blog, first go to the Settings | Other tab.
Here, you can select how much of your content you want to syndicate. "Full" will put the entire content of each post in your site feed, while "Short" only includes an excerpt from the beginning of each post. Select "Until Jump Break" to show all post content before your jump break. The "None" option turns your site feed off entirely. For more advanced options, you can select "Custom."
When you select "Custom," you'll see options for three different types of feeds. Each option has the same "Full," "Short," and "None" setting choices.
  • Blog posts: This is the same as the original, "Allow Blog Feed" option.
  • Comment feed: This will contain all comments made on all posts on your blog.
  • Per-post comment feed: With this option, each individual post will have its own site feed, containing only its own comments.
If you've burned your post feed with FeedBurner, or used another service to process your feed, you will need to go to your blog's settings and complete the setup by redirecting your feed. To redirect your feed, just copy and past the feed URL you received from the service into the "Post Feed Redirect URL" section.
Notes:
  • Once you've enabled your site feeds, you may want to provide a way for your readers to find them. If the template you're using isn't displaying links to these files, you can add them in using the site feed template tags.
  • All site feeds are published in Atom 1.0 format. However, if you add ?alt=rss to the end of any site feed URL, you can get the same feed in RSS 2.0 format.
  • Feedburner has its own 'summary' setting which, if enabled, may affect the display of your feed for the Until Jump Break option. You can correct this by logging into Feedburner and disabling the Summary Burner option from the Optimize tab.

Blogger Guide, how to Create a team blog

By // Tidak ada komentar:

Blogger Guide, how to Create a team blog

Team blogs are quite useful when small groups of people wish to contribute to a single blog. Basically, one person initially creates the blog, then adds other people to it as members.
Team members can either be administrators or not. Administrators can edit all posts (not just their own), add and remove team members (and grant admin access), and modify the blog's settings and template. Non-admins can only create and edit their own posts.
Here's how to add members to your blog:

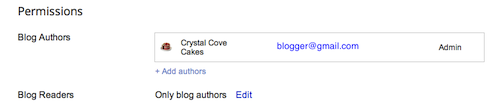
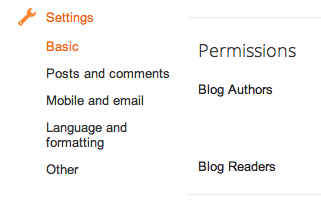
First, find the "Permissions" section under Settings | Basic.
 Settings | Basic
Then click Add Authors:
Add authors
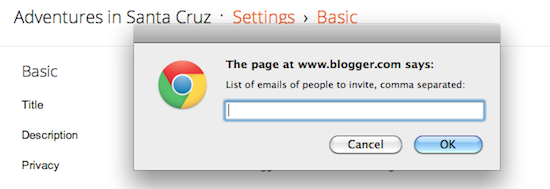
Next, type the email addresses of the people you're inviting to the blog, separating each address with a comma. They'll receive an email with a confirmation link soon. Note that they must have Google Accounts, and if they don't already, they'll be prompted to create one.
Add User
When you're ready to send the invitations, click OK.

Related Articles:

Blogger Guide, Feeds and Syndication

By // Tidak ada komentar:

Blogger Guide, Remove yourself from a team blog

By // Tidak ada komentar:

Blogger Guide, Remove yourself from a team blog

To remove yourself from a team blog, navigate to the Settings | Basic tab for the appropriate blog. If you're an admin member, you'll see a full listing of team members there. Just find your name and click the X next to it.
If you don't have admin rights on the blog, you will see a simpler page, with a Remove yourself from this blog link. Clicking this link will remove you from the blog.
If you remove yourself, your previous posts will still appear on the blog, but you will not be able to make new posts. The blog will no longer appear on your Dashboard or in your profile.

Blogger Guide, Promote Your Blog

By // Tidak ada komentar:

Blogger Guide, Promote Your Blog

Ready for some readers? Check out the tips below to learn the best ways you can get the word out about your blog.
Connect your blog to Google+. Switch your Blogger profile to Google+ to take advantage of automatic sharing, the Google+ blogging community, and upcoming features designed to help you build a following. Learn more about what it means to switch your Blogger profile to Google+.
Write quality content and do it well. No one wants to stumble over bad writing and terrible grammar.
Keep search engines in mind. Take advantage of Blogger’s Search Preferences features to make sure it easier for those seeking your content.
Enable Email This Post. If you use Email This Post on your blog, people will be able to forward your posts to friends. This might not have an immediate impact on your site stats, but it enables others to publicize your blog for you.
Turn on your site feed. When people subscribe to your site feed in their newsreaders, they're more likely to read your posts.
Add your blog to Blogger's listings. When you add your blog to our listings it shows up in Nextblog, Recently Updated, and other places. It's like opting-in to traffic.
Publish regular updates. The more you blog, the more traffic you'll get.
Think of your audience. A good way to build an audience is to speak to one in particular. When you keep your audience in mind, your writing gains focus. Focus goes a long way toward repeat visitors.
Put your blog URL in your email signature. Think of how many forwarded emails you've seen in your day, and just imagine the possibilities.
Submit your address to blog search sites and directories. People look for blog content at Technorati every day, are you on their list? You should be. Submit your blog's url to Technorati, Daypop, Popdex, and any other site of that ilk you come across.
Be an active commenter. If you come across a blog you like, why not leave a comment? This way, others who read and are interested in your comment and click back to your profile and check out your blogs.
Set your blog to Send Pings. When this setting is activated, your blog will be included in various "recently updated" lists on the web as well as other blog-related services.

Blogger Guide, Remove a team member

By // Tidak ada komentar:

Blogger Guide, how to Remove a team member

To remove a team member, go to the Settings | Basic tab and click the X next to the name of person you want to remove:
While this will prevent the removed team member from creating additional posts, it will not remove items previously posted by them.

Blogger Guide, About blog administrators

By // Tidak ada komentar:

Blogger Guide, About blog administrators

An administrator of a team blog has access to the blog's settings and template, as well as the ability to edit and delete posts made by other members of the blog. Additionally, they can add or remove other team members. Any number of members can have admin rights on a single blog.
When you invite a team member to join a blog and they accept your invitation, they are listed as an "Author" by default. Authors can only create and edit their own posts. You can see a member's status in the "Permissions" section of the Settings | Basic tab, and it looks like this:
Add authors
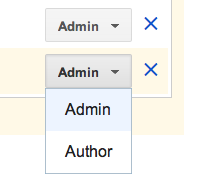
To change an author into an admin, you can use the drop-down menu next to that author's name. If there's only one admin member of a blog, it's not possible to revoke that person's admin rights.

Blogger Guide, Move a blog between account

By // Tidak ada komentar:

Blogger Guide, Move a blog between account

The short answer is that you can do this by making the blog in question a team blog, with two members, then removing the original team member.
In detail, the process goes like this:
  1. Sign in to Blogger with Account 1, which we'll assume is the account containing the blog.
  2. Go to the "Permissions" section under Settings | Basic tab.
    Permissions section
  3. Click the Add Authors button and send an invitation to the owner of Account 2, the account to which you'd like to move the blog.
    Add authors
  4. Wait for the owner of Account 2 to accept the invitation. If you're sharing a computer, you'll need to sign out of Account 1 first, or each use a different browser.
  5. Once Account 2 has joined the blog, Account 1 can sign in again and go back to the Settings | Basic tab.
  6. Click the drop-down menu next to Account 2 and choose "Admin."
  7. Click the X next to Account 1 to remove Account 1.
    Add as admin
Notes:
  • You'll still see any posts made on the blog by Account 1 with Account 1's display name. Account 2 can delete and repost these posts if they'd like to change the display name.
  • Account 1 cannot be removed until Account 2 has admin rights, since every blog must have at least one admin member at all times.
  • Photos uploaded with Account 1 will break if that account is deleted. If you want your old photos to display after adding Account 2, you'll have to leave Account 1 active.

Blogger Guide, Team Blogs, Authors, and Readers

By // Tidak ada komentar: